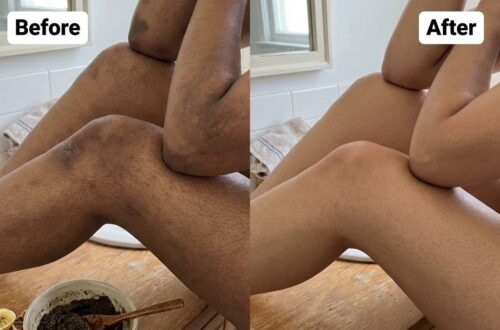
The short version: these DIY toners can be a nice extra step when you want your skin to feel fresher, cleaner, and a little more polished. They are not miracle fixes, but they can fit into a simple routine when you make them gently and use them with some common sense.
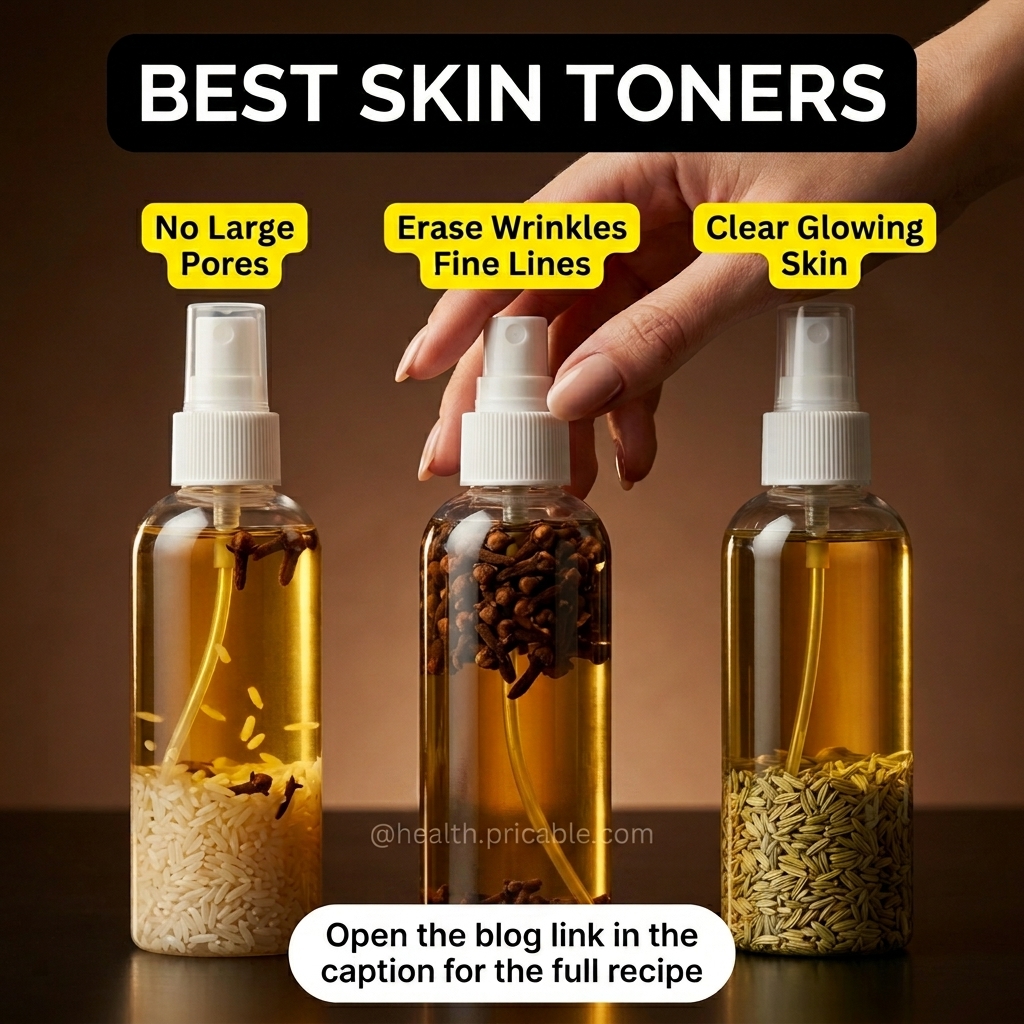
Which DIY toner is best for your goal?
| Skin goal | Best recipe | Texture | How often to use |
|---|---|---|---|
| Smoother-looking pores | Rice water toner | Light, soft, slightly silky | 3 to 4 times a week |
| Fresher-looking fine lines | Diluted clove toner | Strong, spicy, clarifying | 1 to 2 times a week |
| Brighter, clearer-looking skin | Fennel seed toner | Light, herbal, refreshing | Most days if your skin likes it |
Before you make any DIY face toner
A few minutes of prep makes a big difference. Since these are water-based and preservative-free, keep everything as clean as possible and make small batches.
- Wash your hands before you start.
- Use a clean glass jar or spray bottle.
- Use distilled water, or water that has been boiled and fully cooled.
- Strain well so no bits of spice or seed stay in the bottle.
- Store in the fridge, not on the bathroom counter.
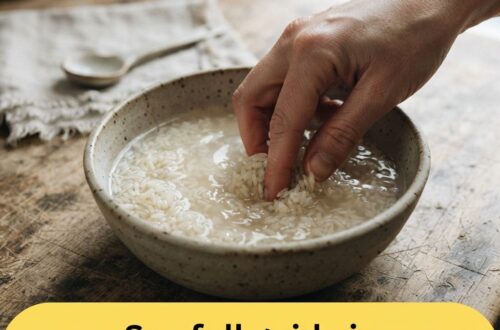
Recipe 1: Rice Water Toner for Smoother-Looking Pores
This is the gentlest starting point for most people. Rice water is popular because it feels light, leaves skin feeling clean, and can make the surface look a little more refined after cleansing. If your goal is a softer, more even look around the nose and cheeks, this is the one to try first.
What you need
- 1/4 cup uncooked white rice
- 1 cup distilled water
- 1 clean bowl
- 1 strainer
- 1 small spray bottle or toner bottle
How to make it
- Rinse the rice quickly to remove surface dust.
- Place the rice in a bowl and pour in the water.
- Let it soak for 30 to 45 minutes.
- Swirl the rice gently with a spoon until the water turns cloudy.
- Strain out the rice.
- Pour the liquid into a clean bottle and refrigerate.
How to use it
After cleansing, mist lightly onto the face or apply with a cotton pad. Focus on the T-zone if that is where you notice texture the most. Let it sit for about 30 seconds, then follow with moisturizer.
Best for
- Oily or combination skin
- Skin that looks a little rough or tired
- People who want a simple, low-effort face mist
A smart tweak
If your skin is very dry, do not use this as your only “hydrating” step. Follow it immediately with a fragrance-free moisturizer so you do not end up feeling tight afterward.
Recipe 2: Diluted Clove Toner for a More Refreshed Look
This is the strongest recipe in the group, which means it is also the one to use most carefully. People love clove-based DIY skincare because it feels intense and gives that clean, tingly, just-did-something effect. But this is not the kind of toner you want to overdo.
If you want to try the clove version, think of it as an occasional treatment-style mist, not an everyday product.
What you need
- 4 whole cloves
- 1 cup distilled water
- Extra 1/2 cup cool distilled water for dilution
- 1 small saucepan
- 1 strainer
- 1 clean bottle
How to make it
- Add the cloves and water to a small saucepan.
- Bring to a gentle simmer for 3 to 5 minutes.
- Turn off the heat and let it steep for 20 minutes.
- Strain out the cloves completely.
- Add the extra cool distilled water to dilute the mixture.
- Pour into a clean bottle and refrigerate.
How to use it
Use this only at night, once or twice a week. Apply a small amount with a cotton pad or one light mist over the lower face and forehead, avoiding the eye area, nostrils, and corners of the mouth. Follow with a plain moisturizer.
Who should skip this one
- Anyone with very sensitive skin
- Anyone with rosacea, eczema, or a damaged skin barrier
- Anyone already using strong exfoliating acids or prescription acne products
Important note
Do not add clove essential oil to this recipe. A simple diluted clove-water infusion is already the boldest formula in this article. Stronger is not better here.
Recipe 3: Fennel Seed Toner for Brighter-Looking Skin
If you want the freshest, prettiest everyday option, this is the one. Fennel seed water has a lighter herbal feel than clove and tends to be the most “face mist” friendly of the three. It is a nice choice when your skin looks flat, dull, or just in need of a reset.
What you need
- 1 teaspoon fennel seeds
- 1 cup hot distilled water
- 1 heat-safe mug or bowl
- 1 strainer
- 1 clean spray bottle
How to make it
- Place the fennel seeds in a mug or bowl.
- Pour the hot water over them.
- Cover and steep for 20 to 30 minutes.
- Strain well.
- Let it cool completely before bottling.
- Refrigerate until ready to use.
How to use it
Mist onto clean skin in the morning or evening, then seal it in with moisturizer. This one also works nicely as a quick midday refresh when your face feels warm or looks tired.
Best for
- Normal skin
- Combination skin
- Skin that looks dull by the end of the day
How to fit these toners into a real skincare routine
The biggest mistake people make with DIY skincare is layering too much. A toner should make your routine simpler, not more chaotic.
Simple morning routine
- Gentle cleanser or a water rinse
- Rice water or fennel toner
- Moisturizer
- Broad-spectrum sunscreen
Simple evening routine
- Gentle cleanser
- One toner only
- Moisturizer
On clove-toner nights, skip scrubs, acid pads, peel solutions, and strong retinoids. Too many “active” steps in one routine is how people end up with redness instead of glow.
What these DIY toners can realistically do
Used correctly, homemade toners can make your skin feel refreshed, remove leftover cleanser, and give your routine a more polished finish. They can also make skin look temporarily smoother, calmer, or brighter depending on the recipe you choose.
What they cannot do is permanently erase lines, shrink pores forever, or replace the basics of a solid skincare routine. If your real goal is long-term improvement, the biggest wins still come from gentle cleansing, a good moisturizer, and daily sunscreen. For more visible fine lines, store-bought retinol or dermatologist-guided care will usually move the needle more than any kitchen recipe.
How long do homemade toners last?
Because these recipes do not contain preservatives, keep the batch small and cold.
- Store in the refrigerator
- Use within 3 to 4 days for best freshness
- Throw it out sooner if the smell changes, the liquid turns cloudy in a strange way, or anything starts floating in it
If you know you will not use it quickly, make half a batch instead of trying to stretch it. Fresh and small is better than full and questionable.
Patch-test rules that are worth following
If you only remember one safety step from this article, make it this one. Test any DIY toner on a small area first, especially the clove version.
- Apply a little on the inside of your arm or along the jawline.
- Wait 24 hours.
- If you get burning, rash, unusual itching, or lingering redness, do not use it on your face.
A slight cool feeling is one thing. Stinging that keeps going is your sign to stop.
Best add-ons if you want better results than a DIY toner alone
If you like the homemade route but want a routine that actually performs better, pair your toner with these basics:
- Fragrance-free moisturizer: helps keep the skin barrier comfortable
- Broad-spectrum SPF 30 or higher: the daily essential if you care about glow and aging
- Retinol or retinoid: better suited for fine-line goals than any face mist
- Niacinamide or salicylic acid serum: a smarter add-on if pore visibility and oiliness are your main concerns
Frequently asked questions
Can I use all three toners in the same week?
Yes, but keep it simple. Try rice water two or three times, fennel on the other days, and clove just once. There is no prize for pushing your skin too fast.
Can I leave these on overnight?
Rice water and fennel are the better candidates for leave-on use if your skin tolerates them well. The clove version is better treated as a shorter, lighter application unless you already know your skin handles it well.
Can I add lemon juice, vitamin E, or aloe vera?
You can, but more ingredients do not automatically make a recipe better. Lemon is a common reason DIY skincare backfires, and aloe or oils can make a homemade mixture spoil faster if you are not careful. For most people, the simplest version is the safest version.
Which recipe is the gentlest?
For most skin types, fennel is the easiest one to start with, followed by rice water. Clove is the most likely to feel strong.
The bottom line
If you want one easy DIY skincare project that actually feels useful, start with the rice water toner for smoother-looking texture or the fennel toner for a fresh glow. Save the clove toner for occasional use and keep it diluted.
Used the right way, these recipes can be a fun extra step that makes your routine feel a little more intentional. Just keep expectations realistic, keep your batches small, and protect your skin barrier like it matters, because it does.