There’s nothing quite like the satisfaction of harvesting your own vegetables. But after all that hard work, seeing your homegrown bounty spoil too quickly can be disheartening. What if there was a simple, natural way to significantly extend the freshness and flavor of your harvest? Enter the art of curing!
Curing is a traditional technique that prepares certain vegetables for long-term storage, helping them develop tougher skins and heal minor wounds, ultimately preventing rot and enhancing their natural flavors. It’s a game-changer for any gardener looking to enjoy their harvest well into the colder months.
What Exactly is Curing?
Curing is a process of drying and hardening the outer skin of certain root vegetables and alliums after they are harvested. This crucial step allows the skin to toughen, sealing in moisture and nutrients while creating a protective barrier against decay and diseases. Think of it as a natural band-aid and a protective shield for your veggies, making them less susceptible to pests and spoilage.
Why Bother with Curing?
- Extended Storage Life: This is the primary benefit. Cured vegetables can last for weeks, or even months, longer than uncured ones.
- Improved Flavor: Curing often concentrates sugars and enhances the flavor profile of the vegetable.
- Reduced Spoilage: By healing minor cuts and strengthening the skin, curing prevents bacteria and fungi from entering and causing rot.
- Better Texture: Some vegetables, like sweet potatoes, develop a creamier texture after curing.
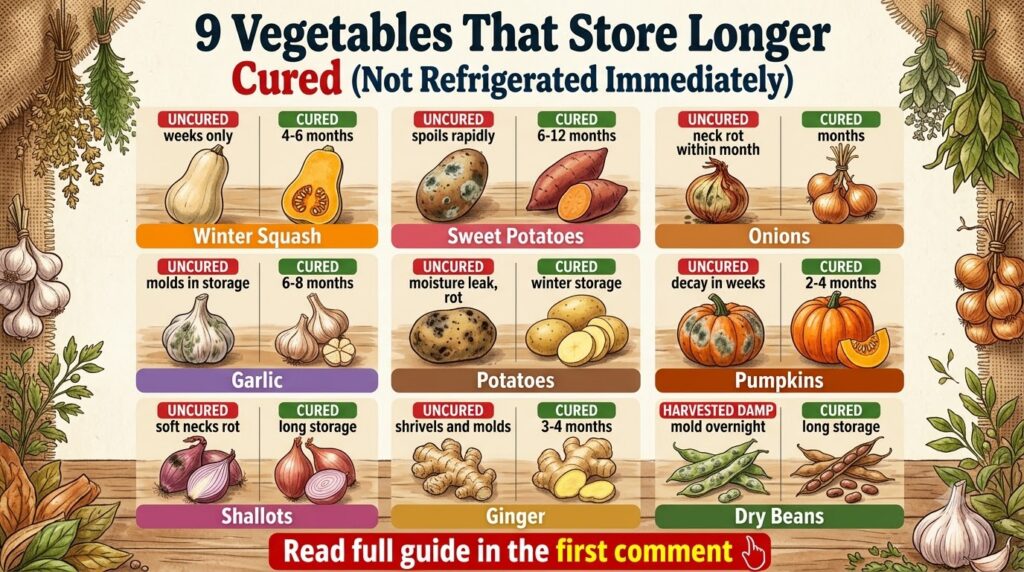
Which Vegetables Benefit Most from Curing?
Not all vegetables require curing, but for those that do, it’s indispensable. The most common candidates for curing include:
- Onions & Garlic: Essential for a long kitchen life.
- Sweet Potatoes: Curing improves their sweetness and texture.
- Winter Squash: Varieties like butternut, acorn, and spaghetti squash benefit immensely.
- Potatoes: Helps them form a tough skin and heal minor bruises.
How to Cure Your Homegrown Veggies: Step-by-Step Guide
While the general principle is similar, specific conditions vary slightly for different vegetables.
1. Curing Onions & Garlic
- Harvest: Dig up onions when their tops fall over and start to yellow. For garlic, harvest when the bottom leaves start to yellow, but there are still 4-5 green leaves at the top.
- Initial Drying: Brush off excess soil but do not wash. Lay them in a single layer in a warm (75-85°F / 24-29°C), dry, well-ventilated area, out of direct sunlight. A garage, shed, or even a covered porch works well.
- Curing Period: Allow them to cure for 2-4 weeks. You’ll know they’re ready when the necks are completely dry, and the outer skins are papery and rustle easily.
- Storage: Once cured, trim the tops to about 1 inch (2.5 cm) and roots close to the bulb. Store in mesh bags or braid garlic and hang in a cool (35-50°F / 2-10°C), dry, dark, well-ventilated place.
2. Curing Sweet Potatoes
- Harvest: Dig sweet potatoes before the first frost, usually when vines start to yellow. Handle gently to avoid bruising.
- Initial Drying: Brush off excess soil, but do not wash.
- Curing Environment: Place sweet potatoes in a single layer in a very warm (85-90°F / 29-32°C) and humid (85-90% relative humidity) environment for 5-10 days. A greenhouse, a room with a humidifier, or even a cardboard box with a damp cloth inside can work.
- Storage: After curing, store them in a cool (55-60°F / 13-16°C), dark, and moderately humid place. Do not refrigerate.
3. Curing Winter Squash
- Harvest: Harvest winter squash when they are fully mature, skins are hard, and vines have begun to die back. Leave a 2-3 inch (5-7.5 cm) stem attached to prevent rot.
- Curing Environment: Place squash in a warm (70-80°F / 21-27°C) and moderately humid (60-70%) area for 10-14 days. Sunlight is beneficial during this period as it helps harden the skin.
- Storage: After curing, move them to a cool (50-55°F / 10-13°C), dry place with good air circulation.
4. Curing Potatoes
- Harvest: Gently dig potatoes when the plants have died back.
- Curing Period: Lay potatoes in a single layer in a cool (50-60°F / 10-16°C), dark, and humid (85-95%) place for 1-2 weeks. This allows minor cuts to heal and the skins to set.
- Storage: After curing, store them in a cool (35-40°F / 2-4°C), dark, and humid environment. Avoid light, as it can turn them green and produce solanine, which is toxic.
General Curing & Storage Tips for Success
- Handle with Care: Always handle your harvested vegetables gently to avoid nicks and bruises, which can lead to spoilage.
- Good Air Circulation: Proper airflow is key during curing to prevent mold and encourage drying.
- Monitor Conditions: Keep an eye on temperature and humidity. Too cold or too hot, or too dry or too wet, can hinder the curing process.
- Inspect Regularly: Even after curing, check your stored produce periodically and remove any that show signs of spoilage to prevent it from spreading.
Enjoy Your Harvest Longer!
Curing is a simple yet powerful technique that transforms your freshly harvested vegetables into long-lasting pantry staples. By taking a little extra time after harvest, you can enjoy the fruits (and vegetables!) of your labor for many months, reducing waste and maximizing your homegrown bounty. Give it a try this season and taste the difference!