In a world increasingly focused on sustainability and mindful living, finding ways to reduce waste and embrace self-sufficiency has become more important than ever. One delightful and surprisingly easy way to contribute to both is by regrowing vegetables, fruits, and herbs from kitchen scraps. Imagine turning what would normally end up in your compost bin or trash into fresh, edible produce for your family. It’s not just a clever trick; it’s a practical, rewarding, and fun gardening endeavor!
This comprehensive guide will walk you through the simple steps of giving new life to common kitchen scraps, transforming them into new plants. Whether you’re a seasoned gardener or just starting, you’ll find joy and success in this eco-friendly practice.
 Turn your kitchen waste into a thriving indoor garden with these simple regrowing techniques.
Why Regrow Kitchen Scraps?
The benefits of regrowing kitchen scraps extend far beyond just having fresh produce. Here’s why you should give it a try:
- Reduce Food Waste: A significant amount of household waste comes from food scraps. By regrowing them, you’re actively participating in reducing your carbon footprint.
- Save Money: Who doesn’t love free food? Extend the life of your groceries and cut down on your produce bill.
- Fresh & Organic Produce: Enjoy the freshest produce possible, knowing exactly where it came from and how it was grown (without pesticides!).
- Educational Fun: It’s a fantastic project for kids, teaching them about plant life cycles, sustainability, and where their food comes from.
- Year-Round Gardening: Many scraps can be regrown indoors, allowing you to garden even during colder months.
- Boost Your Well-being: The act of nurturing plants can be incredibly therapeutic and satisfying.
General Tips for Success
Before diving into specific plants, here are some universal tips to ensure your regrowing efforts thrive:
- Light is Key: Most plants need plenty of sunlight. A sunny windowsill is often perfect, especially one that receives at least 4-6 hours of direct sunlight.
- Fresh Water: If growing in water, change it daily or every other day to prevent mold and provide oxygen.
- Well-Draining Soil: When transplanting to soil, use a good quality potting mix that drains well.
- Patience: Regrowing takes time. Don’t get discouraged if you don’t see immediate results.
- Warmth: Most kitchen scraps prefer warmer temperatures, mimicking their natural growing conditions.
 A sunny windowsill is often all you need to kickstart your regrowing adventure.
Your Guide to Regrowing Common Kitchen Scraps
1. Leafy Greens: Lettuce, Celery, Bok Choy, Romaine
These are some of the easiest and most satisfying scraps to regrow, offering quick results.
- How To: Cut about 1-2 inches from the base of the head. Place the base in a shallow bowl with about half an inch of water, ensuring the cut side is up.
- Care: Place in a sunny spot. Change the water daily. New leaves will start to sprout from the center in a few days. Once roots are established and new growth is significant (1-2 weeks), you can transplant the base into a pot with soil or continue growing in water.
- Harvesting: Snip off outer leaves as needed, allowing the center to continue producing.
2. Root Vegetables & Bulbs: Green Onions, Garlic, Onions, Carrots
Green Onions (Scallions)
- How To: Keep the white base with about an inch of green attached. Place them root-side down in a small glass with just enough water to cover the roots.
- Care: Place on a windowsill. Change water daily. New green shoots will appear rapidly, often within a day or two.
- Harvesting: Snip off the green tops as you need them. They will regrow multiple times!
Garlic
- How To: If you have a garlic clove that’s starting to sprout green, plant it directly in a small pot with soil, root-end down, about an inch deep. You can also place an unpeeled clove in a shallow amount of water.
- Care: Keep the soil moist or change water regularly. Green shoots will emerge.
- Harvesting: You can harvest the green garlic shoots (similar to chives) or allow them to grow for a full season to potentially produce a new head of garlic.
Onions
- How To: Cut the root end of an onion, leaving about half an inch of the bulb. You can place it in a shallow cup of water or directly plant it in soil.
- Care: If in water, change daily. If in soil, ensure it’s moist. New green shoots will grow.
- Harvesting: You can harvest the green onion tops, or for a new bulb, allow it to grow in soil for several months.
Carrot Tops
- How To: Cut about an inch off the top of a carrot. Place the top in a shallow dish of water, cut side down.
- Care: Keep in a sunny spot and change water daily. Green shoots will emerge.
- Harvesting: While you won’t get a new carrot root this way, you’ll get edible greens that are great in salads or as a garnish.
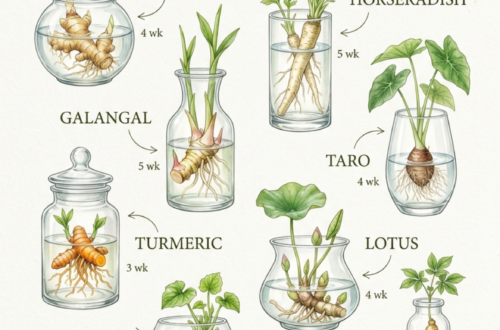
3. Tubers & Rhizomes: Potatoes, Sweet Potatoes, Ginger
Potatoes
- How To: If a potato has ‘eyes’ (small sprouts), cut the potato into chunks, making sure each chunk has at least one or two eyes. Let the chunks dry for a day or two to form a protective layer.
- Care: Plant the dried chunks directly in soil, about 4-6 inches deep, with the eyes facing upwards. Keep the soil consistently moist.
- Harvesting: Potatoes take a full growing season. You’ll know they’re ready when the plant flowers and then starts to die back.
Sweet Potatoes
- How To: Place a whole sweet potato halfway submerged in water using toothpicks to suspend it.
- Care: Place in a warm, sunny spot. Roots will form from the bottom, and ‘slips’ (sprouts) will grow from the top. Once the slips are about 4-6 inches long, twist them off and place them in a separate glass of water until they develop roots.
- Harvesting: Once the slips have roots, plant them in soil. Sweet potatoes take several months to mature.
Ginger
- How To: Find a piece of ginger root with visible ‘eyes’ or buds (small bumps). Plant it directly in moist potting soil with the eye facing up, just below the surface.
- Care: Keep the soil moist but not waterlogged. Ginger prefers warmth and indirect light.
- Harvesting: After several months, you can gently dig around the plant to harvest small pieces, or let it grow for a full season for a larger harvest.
4. Herbs & Fruits: Basil, Pineapple
Basil
- How To: Take 4-inch cuttings from a basil plant, just below a node (where leaves branch off). Remove the lower leaves. Place the cuttings in a glass of water.
- Care: Keep in a warm, sunny spot. Change water every day or two. Roots should appear in about a week.
- Harvesting: Once roots are about 1-2 inches long, transplant to a pot with soil. Continue to harvest by pinching off leaves or small branches.
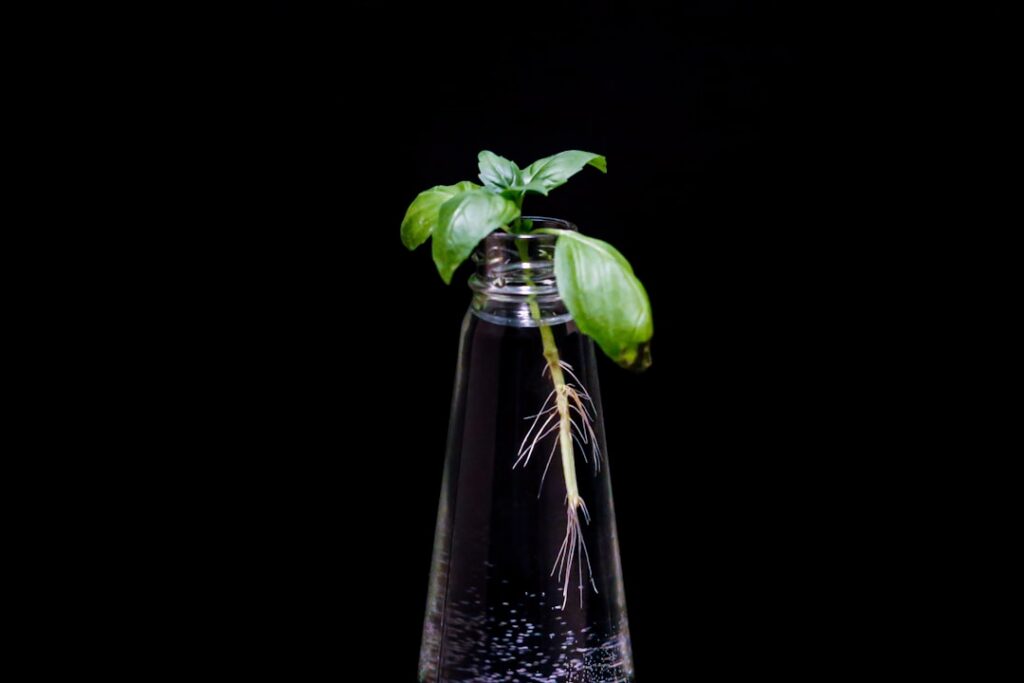 Basil is incredibly easy to root from cuttings, providing fresh herbs in no time.
Pineapple
- How To: Twist off the leafy crown from a ripe pineapple. Remove a few layers of the lowest leaves until you expose some root nodes. Let the crown dry for a day or two to prevent rot.
- Care: Suspend the crown over a glass of water, ensuring only the bottom inch is submerged, or plant directly in moist potting soil. Keep in a warm, sunny location.
- Harvesting: Pineapple takes 2-3 years to fruit, but it makes a beautiful, exotic houseplant in the meantime!
Troubleshooting Common Issues
- Rot: If your scraps start to rot, it’s usually due to stale water or too much moisture in the soil. Ensure you’re changing water regularly and that soil has good drainage.
- No Growth: Lack of sufficient light or warmth can hinder growth. Try moving your plants to a sunnier, warmer spot.
- Pests: Indoor plants can still attract pests. Inspect your plants regularly and address any issues with organic pest control methods like neem oil or insecticidal soap.
Get Started Today!
Regrowing kitchen scraps is a rewarding journey that connects you more deeply with your food and the environment. It’s an act of sustainability, a source of fresh produce, and a fun experiment all rolled into one. So next time you’re about to toss those leftover bits, remember: don’t toss it, plant it!
With a little patience and care, your kitchen can become a thriving mini-farm, providing you with a continuous supply of fresh, homegrown goodness. Happy regrowing!