Imagine having a constant supply of fresh, pungent ginger right at your fingertips, ready to spice up your cooking, soothe a sore throat, or add zest to your morning tea. Growing ginger at home is not only incredibly rewarding but also surprisingly straightforward, even for novice gardeners. Beyond the culinary delight, you might even be treated to its surprisingly beautiful, exotic blooms!
This comprehensive guide will walk you through every step, from selecting the perfect rhizome to harvesting your abundant crop and even encouraging those elusive ginger flowers.
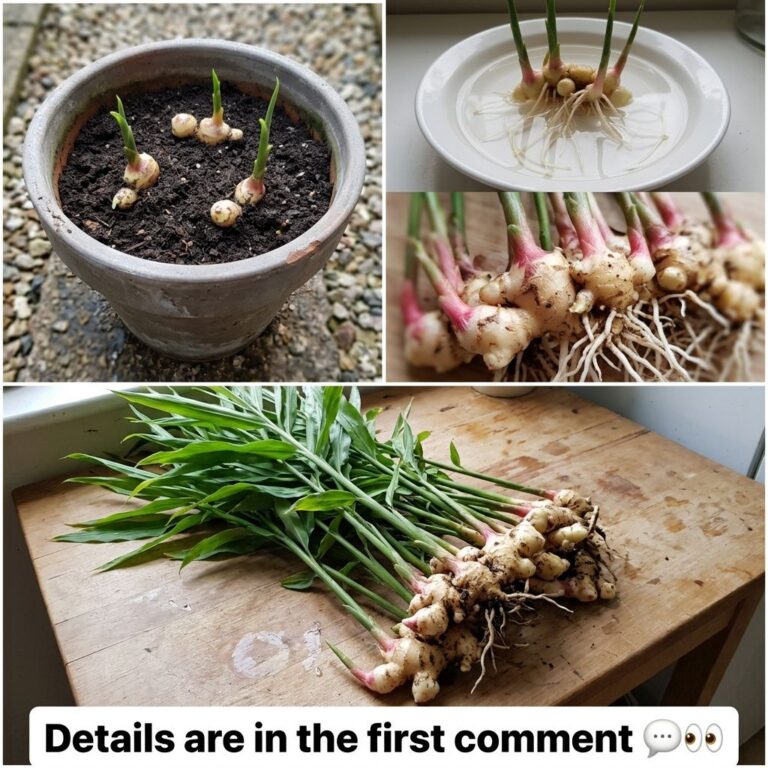
1. Selecting the Right Ginger for Planting
The success of your homegrown ginger begins with a healthy start. Don’t just grab any piece of ginger from the grocery store. Look for specific qualities:
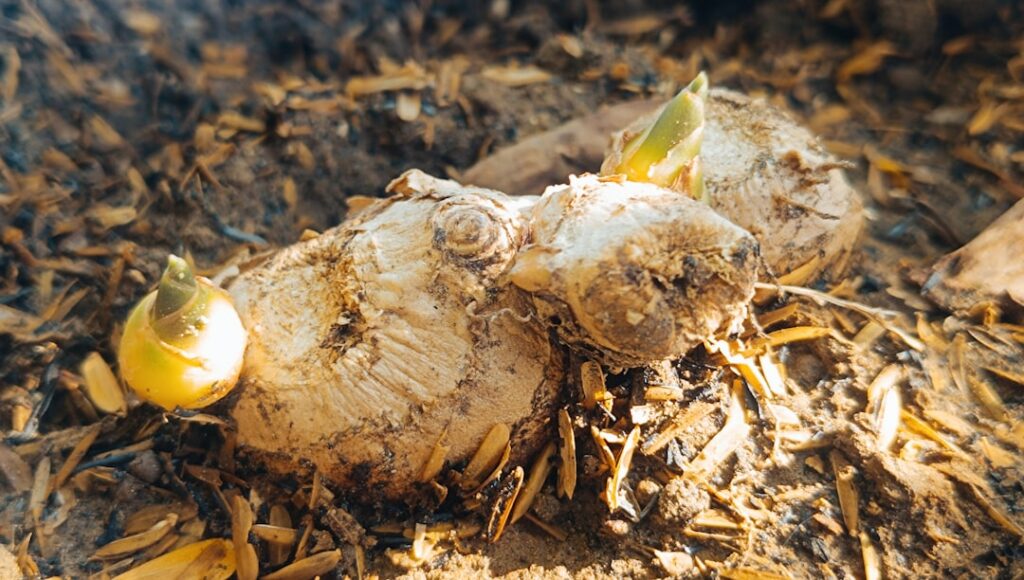
- Firm and Plump: The ginger rhizome (the part you eat) should feel solid and heavy, not soft or shriveled.
- Well-Developed “Eyes”: These are the small, often light-colored or greenish buds or nodes on the ginger. They look similar to potato eyes. These are where new shoots will emerge.
- Avoid Blemishes: Steer clear of any pieces with mold, soft spots, or a strong chemical smell, as these indicate rot or treatment that might inhibit growth.
Organic ginger is often a safer bet as it’s less likely to have been treated with growth inhibitors, which can sometimes be applied to conventional produce to prevent sprouting.
2. Preparing Your Ginger Rhizome for Growth
Once you have your ideal ginger piece, a little preparation can significantly boost its chances of sprouting:
- Hydration Soak: Place the entire rhizome in a bowl of lukewarm water and let it soak overnight. This helps rehydrate it and kickstart the sprouting process, especially if it’s been sitting on a shelf for a while.
- Sectioning: After soaking, cut the rhizome into smaller sections. Each section should be at least 1-2 inches long and have at least one or two prominent “eyes.” A clean, sharp knife is essential to prevent damage and potential disease.
- Callus Formation (Optional but Recommended): Allow the cut pieces to air dry for a day or two in a warm, dry spot. This forms a protective callus over the cut surfaces, which helps prevent rot once planted.
3. Choosing the Ideal Container and Soil
Ginger isn’t picky about depth but loves to spread out. Therefore, your container choice matters:
- Wide and Shallow: Opt for a pot that is at least 12-15 inches in diameter and about 8-10 inches deep. This gives the rhizomes plenty of room to expand horizontally.
- Excellent Drainage: Drainage holes are non-negotiable. Ginger absolutely detests sitting in water, which can quickly lead to rot.
- Quality Potting Mix: Fill your container with a well-draining, loose potting mix rich in organic matter. A good mix might include compost, perlite, and coconut coir to ensure aeration and moisture retention without becoming waterlogged.
4. Planting and Initial Watering
Now it’s time to get your ginger into its new home:
- Positioning: Place each ginger section just below the soil surface, with the “eyes” facing upwards. If you’re planting multiple pieces in one large pot, space them about 6 inches apart.
- Covering: Lightly cover the rhizomes with about 1 inch of potting mix.
- Initial Watering: Water thoroughly after planting until you see water draining from the bottom of the pot. From this point forward, keep the soil consistently moist but never soggy.
5. Providing Ideal Growing Conditions
Ginger is a tropical plant, so replicating its natural environment is key to success:
- Temperature: Maintain a warm environment, ideally between 75-85°F (24-29°C). If you live in a cooler climate, consider growing ginger indoors or in a greenhouse.
- Humidity: High humidity is crucial. You can increase humidity by misting the leaves daily, placing the pot on a humidity tray (a tray filled with pebbles and water, ensuring the pot doesn’t sit directly in the water), or using a small room humidifier.
- Light: Ginger prefers partial shade to filtered sunlight. Avoid harsh, direct afternoon sun, which can scorch the leaves. An east-facing window or a spot under a larger plant is often ideal.
6. Ongoing Watering and Fertilizing
Consistency is key for a happy ginger plant:
- Watering: Keep the soil consistently moist throughout the growing season. Allow the top inch of soil to dry out slightly between waterings, but don’t let it become completely dry. Reduce watering in cooler months or if the plant goes dormant.
- Fertilizing: Ginger is a heavy feeder. During the active growing season (spring through fall), fertilize every 2-4 weeks with a balanced liquid fertilizer (e.g., 10-10-10) or an organic option like fish emulsion or compost tea.
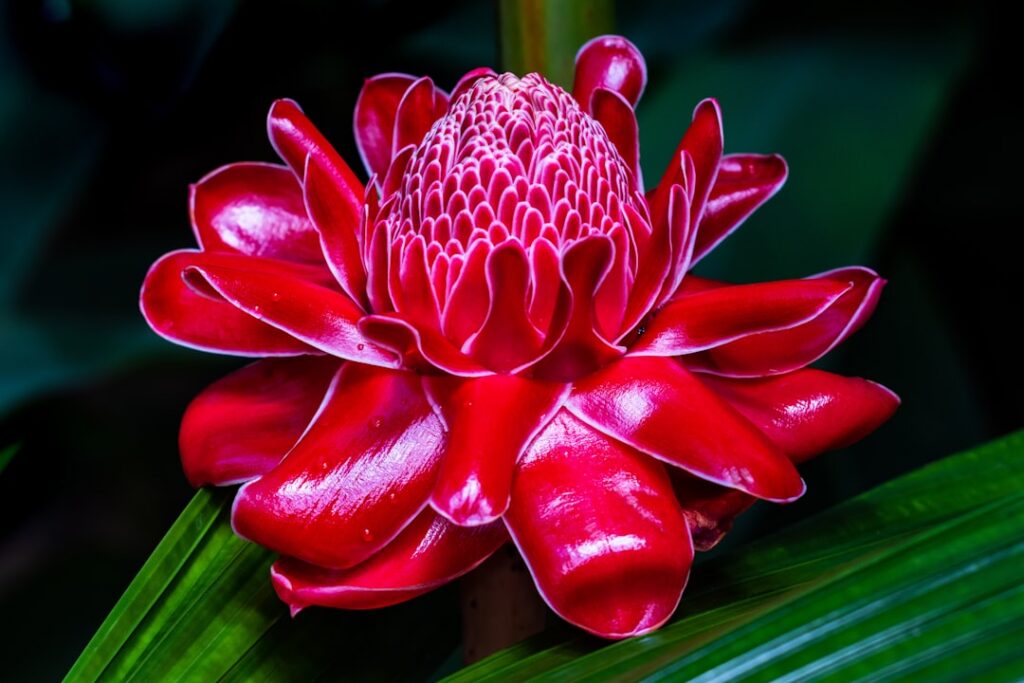
7. Encouraging Beautiful Ginger Blooms
While often grown for its rhizome, ginger can also produce stunning, cone-shaped flowers that range in color from pink to red to yellow, often with fragrant blooms. To encourage flowering:
- Patience is Key: Ginger typically needs 2-3 years of mature growth before it starts to flower. Don’t expect blooms in the first year.
- Consistent Care: Provide ample sunlight (but still filtered), warmth, and high humidity consistently over a long period.
- Avoid Disturbances: Once established, try not to disturb the plant by constantly digging up rhizomes or repotting. Let it settle and mature.
- Nutrient Balance: Ensure a good balance of nutrients, particularly phosphorus and potassium, which support flowering.
8. Harvesting and Enjoying Your Homegrown Ginger
The best part! After 8-10 months of growth, your ginger will be ready for harvest. You’ll know it’s ready when the leaves start to yellow and die back.
- Partial Harvest: You don’t have to harvest the entire plant at once. Gently dig around the edges of the pot to locate mature rhizomes. Cut off what you need, leaving some younger pieces in the soil to continue growing.
- Full Harvest: For a full harvest, carefully tip the entire pot and separate the rhizomes from the soil. Remove any roots and bits of stem.
- Storage: Freshly harvested ginger can be stored in a cool, dry place for several weeks. For longer storage, you can freeze it whole, grated, or sliced, or even dry it.
- Replanting: Select some of the healthiest, plumpest pieces with good eyes from your harvest and replant them to ensure a continuous, endless supply!
Conclusion: A Rewarding Journey to Endless Ginger
Growing ginger at home is a wonderfully rewarding experience that connects you with nature and provides a continuous bounty of fresh, flavorful rhizomes. With a little patience and consistent care, you can enjoy the satisfaction of homegrown goodness, enhance your culinary creations, and perhaps even witness the rare beauty of a ginger flower, right in your own home. Embark on this journey today and transform your kitchen into a self-sustaining hub of herbal delight!